


Preparation time
10min
Total time
1h 39min
Portion
6
portion(s)
Level
medium
- TM 6
- TM 5

published: 2020/06/22
changed: 2021/05/19
Ingredients
'The Real Deal' Creme Brulee
- 600 g pure cream, 35% Milk Fat
- 40 g caster sugar
- 6 portions egg yolks, Approx. 100-104g (from XL eggs)
- 1 level tsp vanilla extract
- 1 level tsp Vanilla Bean Paste, or pods from one Vanilla Bean
- caster sugar, Extra for making the Sugar toffee on top.
Accessories you need
-
 Varoma
 -
 Butterfly
 -
 Spatula TM5/TM6


Share your activity
I'm cooking this todayRecipe's preparation
- - Ensure eggs are at room temp. Leave them out the night before you plan on making the creme brulee.


- This method is prepared solely in the Thermomix TM6 without the need to do the bain-marie method in the oven.
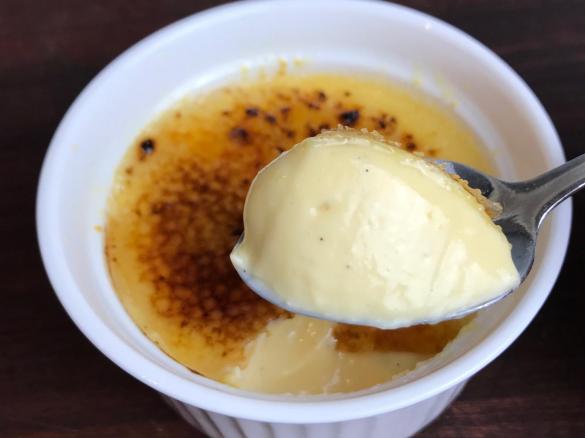
- Follow this method for a smooth /soft-set consistency, that should hold its shape and an added bonus benefit of no 'eggy' taste.
- Prepare your ramekins. Ensure they are clean and completely dry. If using small ramekins (70-75 ml) - you should get between 8 servings. If using 100 ml ramekins you will get about 6 servings easily. The mixture should make around 600 ml.
- If serving alongside other desserts you may want to consider the smaller portions. - Make the Creme Brulee Mixture ...

2a. - INSERT the WHISK into the bowl.
2b. - Place in TM bowl, 600g Pure Cream, 40g caster sugar, vanilla extract, vanilla bean paste or/seeds of one vanilla pod, and the yolks.
2c. - With Measuring Cup (MC) in place and whisk in,
Mix - 1 min / Speed 3
2d. - Scrap the sides of the bowl. Leave the whisk in place.
2e. - Place lid on TM. Replaced MC with the Varoma dish (no lid).
Set TM to this time:
60 min / 90 degrees / Speed 3
If there is too much splashing drop the speed to 2.5. Using the Varoma dish will allow for evaporation and prevent creme from splashing out of the bowl.
2f. - At the 15 min mark left of the timer - drop the speed to 2.5 if not done already
- When time is done, remove the whisk and stir the base and scrape the sides of the bowl.
2g.- Place Lid and MC on - Activate Thicken Mode.
- Repeat Thicken Mode (up to three times in total).
- For TM5 owners - see tips below.
(Thicken Mode on TM6 only - is set at 80 degrees and will run for around 8 minutes each time - depending on the cream you have used).
Pouring the Creme Brulee in Ramekins
- Once finished, carefully removing the lid, pour the Brulee mixture evenly into ramekins via a mesh sieve.
- Dab away air bubbles from the top of the Creme Brulee's with a clean paper towel.
- Leave to cool completely on bench (covered with a paper towel) before refrigerating, preferably overnight, or for at least 4 hours or until very cold. Cover each ramekin with plastic wrap before refrigerating. It must be cold before proceeding to the next step. - Prepare to Serve:

- When you are ready to serve, prepare your blow torch and extra castor sugar.
- Remove Creme Brulee from the fridge and place it on a heat resistant metal tray. Ensure there are no flammable objects nearby.
- remove any dampness from the top of the brulee with a clean paper towel
- To ensure that the custard does not warm up too much during the torching phase, I recommend you set the ramekin in an ice bath when applying the flame onto the sugar.
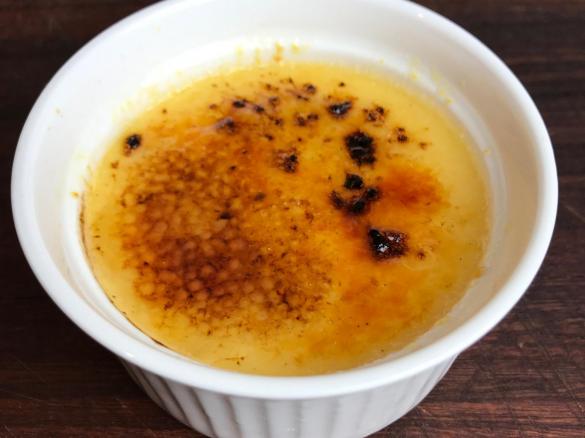
- Sprinkle a single but decent layer of Castor Sugar on each Creme Brulee and proceed to apply the blow torch onto the sugar in an even circular motion until sugar is golden brown.
- If desired, repeat another layer of Castor Sugar and apply the blow torch on it one last time till golden in color. Just note that repeating a second time may warm up the brulee too much and undo all your hard work. Better to do it once only and do it right.
(Careful - Ramekin will be hot to touch!)
- I recommend leaving them in the ice bath for 10 mins before serving, then...dry the outer side of the ramekin before plating up. - Serve Up

- Carefully place each ramekin on a small ceramic plate and serve immediately. (Once the sugar has been applied - you will have to start the caramelisation of the sugar). The Brulee mixture will keep well for up to 5 days in the fridge (without the sugar topping). Enjoy!
If you try this method, I would love to hear how you went. Please comment here and share your photos. You can find me on Facebook, Instagram & TikTok at @Thermo.Cazza
Thank you for viewing, Carolyn Booth
Before you start.

Tip
TM5 Users can do this recipe - but will need to change the last step that requires using the Thickening Mode.
Instead, just blend for 16 min / 80 degrees / speed 5, MC on.
To test for setting:- how do you know if the brulee is set? After the Brûlée has been poured into the ramekin and allowed to cool it should wobble only a little bit and should not be runny. If after it has cooled in the fridge you find that it is still runny, then clearly it has not set. I recommend returning the whole mixture back into a clean Thermomix bowl, insert whisk, 30 mins / 90 deg / speed 3 - no MC - it shouldn't splash out. If you see any splatter pop the basket on the lid instead of the Measuring Cup. When removing the lid, do not let any condensation drop back into the Brûlée.
You may stir the base - just be careful here as there may be hardened custard at the base of the bowl. If it's only a thickish custard, it may be ok to blitz the custard briefly for around 20 sec /speed 6 before straining the whole Brûlée mixture into clean and dry ramekins.
For additional advise message me through my Facebook page @Thermo.Cazza
Thermomix Model
-
 Recipe is created for
TM 6
For cooking (simmering) at temperatures of 95°C or above (200°F), the simmering basket should always be used instead of the TM6 measuring cup, as the TM6 measuring cup fits tightly in the lid. The simmering basket rests loosely on top, is steam-permeable, and also prevents food spatter from the mixing bowl. -
 Recipe is created for
TM 5
If you are using a Thermomix® TM6 measuring cup with your Thermomix® TM5:
For cooking (simmering) at temperatures of 95°C or above (200°F), the simmering basket should always be used instead of the TM6 measuring cup, as the TM6 measuring cup fits tightly in the lid. The simmering basket rests loosely on top, is steam-permeable, and also prevents food spatter from the mixing bowl.Please note that the TM5 mixing bowl has a larger capacity than the TM31 (capacity of 2.2 liters instead of 2.0 liters for TM 31). Recipes for the Thermomix TM5 may not be cooked with a Thermomix TM31 for safety reasons without adjusting the quantities. Risk of scalding by spraying of hot liquids: Do not exceed the maximum filling quantity and observe the filling level markings of the mixing bowl!


This recipe was provided to you by a Thermomix ® customer and has not been tested by Vorwerk Thermomix ® or The Mix Australia Pty Ltd and The Mix New Zealand Ltd.
Vorwerk Thermomix ® and The Mix Australia Pty Ltd and The Mix New Zealand Ltd assume no liability, particularly in terms of ingredient quantities used and success of the recipes.
Please observe the safety instructions in the Thermomix ® instruction manual at all times.
Other users also liked
Show me similar recipes by:


Comments
Just made a couple of tweaks to make the recipe easier to follow. Let me know if you need clarification on any steps.
Please get in touch if you have questions about my method for Creme Brulee. @Thermo.Cazza