
Preparation time
12h 0min
Total time
12h 30min
Portion
0
portion(s)
Level
medium

Ingredients
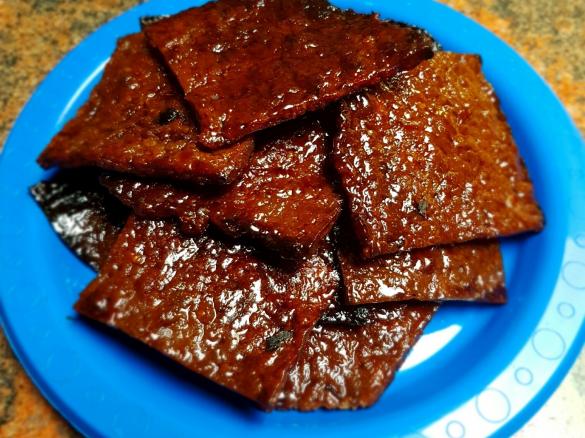
Bak Kwa(Chinese Pork Jerky)
Mixture
- 450 grams Minced pork with approximately 10 to 20 percent fat, may mince it yourself or ask the butcher to mince it for you
- 1/2 tablespoon Chinese cooking wine or brandy
- 1/2 tablespoon fish sauce
- 1 tablespoon oyster sauce
- 1 teaspoon Dark caramel sauce
- 1/4 level teaspoon 5 Spice powder
- dash pepper
- 1/2 teaspoon salt
- 2 tablespoons honey
- 100 grams brown sugar
Accessories you need
-
 Spatula TM5/TM6
Share your activity
I'm cooking this todayRecipe's preparation
- 1. Cut your meat and fat into 1 cm cubes and par freeze your pork and fat for approximately 1 hour before mincing. It is very important to have the fat to ensure your end result is lovely and moist otherwise if it is too lean, it will be too chewy.
2. Place half the pork and fat in TM bowl and Turbo 2-3 times till desired consistency, set aside then repeat with the other half.
3. Put the rest of the mince back in the TM bowl, add the rest of the ingredients. Mix on sp 8 for 1 min. With dial set to closed lid position(TM31 users), knead for 1 min on interval speed. Texture needs to look "gluey" or the meat will not stick together. Set aside in a bowl and refrigerate overnight.
4. Cut 4 pieces of baking paper to fit 2 baking trays. place half the mixture on one sheet then place another baking sheet on top. Flatten and spread meat out slightly then use a rolling pin to spread the mixture out evenly into a rectangle. thickness should be approximately 1/2- 3/4 cm. Place baking tray in the fridge for a few hours or overnight.
5. When ready to bake, preheat oven to 140deg C fanforce. Take trays out of the fridge and peel off the top layer of baking paper( it should be easy to peel off paper now) and place 2 trays in the oven and bake for 15 to 20 mins depending on how powerful your oven is. If you do not have fanforce function on your oven, preheat oven to 140degC and bake 1 tray at a time. When time is up, remove both trays from the oven then increase the oven temp to 240deg C with grill function on as well.( If you do not have that function in your oven, you can just use the grill function or better still use your barbecue to finish off the last process).
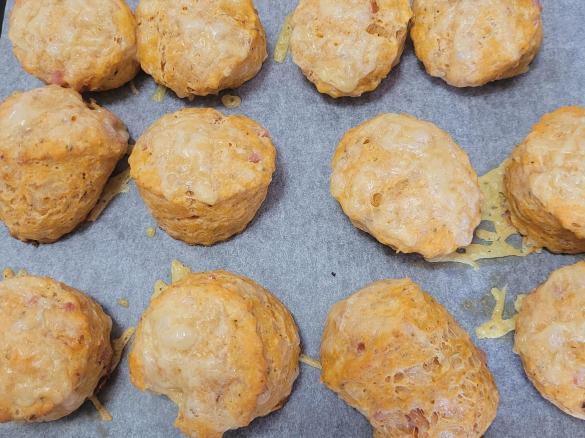
6. Use a pizza cutter or a pair of kitchen scissors to cut your meat into desired squares. Be very careful to keep an eye on the meat as time depends on how thin you have rolled your meat. Bake 1 tray at a time for 7-10 mins then flip the meat over and bake for another 5-7 mins. Meat will caramelise quiickly because I use brown sugar but you may use white sugar as well if you wish. When cooked, transfer to a cooling rack and enjoy. Refrigerate if needed but they are so scrumptious, it may not make it to the fridge.
Tip
Ask your butcher to mince your meat for you if you are pressed for time.
Thermomix Model
-
 Recipe is created for
TM 5
If you are using a Thermomix® TM6 measuring cup with your Thermomix® TM5:
For cooking (simmering) at temperatures of 95°C or above (200°F), the simmering basket should always be used instead of the TM6 measuring cup, as the TM6 measuring cup fits tightly in the lid. The simmering basket rests loosely on top, is steam-permeable, and also prevents food spatter from the mixing bowl.Please note that the TM5 mixing bowl has a larger capacity than the TM31 (capacity of 2.2 liters instead of 2.0 liters for TM 31). Recipes for the Thermomix TM5 may not be cooked with a Thermomix TM31 for safety reasons without adjusting the quantities. Risk of scalding by spraying of hot liquids: Do not exceed the maximum filling quantity and observe the filling level markings of the mixing bowl!

This recipe was provided to you by a Thermomix ® customer and has not been tested by Vorwerk Thermomix ® or The Mix Australia Pty Ltd and The Mix New Zealand Ltd.
Vorwerk Thermomix ® and The Mix Australia Pty Ltd and The Mix New Zealand Ltd assume no liability, particularly in terms of ingredient quantities used and success of the recipes.
Please observe the safety instructions in the Thermomix ® instruction manual at all times.
Other users also liked
Show me similar recipes by:


Comments
This looks and sounds delish! I am going to give it a go - thanks for the recipe