

Ingredients
Base
- 130 grams raw macadamia nuts, either unsoaked, or soaked and dehydrated
- 70 grams organic shredded or flaked coconut, additive free
- 8 Fresh Dates, pitted
- pinch fine Himalayan salt
Filling
- 2 vanilla beans, snipped in 4 pieces
- 2 Limes, zest only, peel with potato peeler
- 150 grams raw cashews, soaked for 6 hours, rinsed, patted dry
- 1 lime, flesh only
- 320 grams avocado, fresh or frozen, cubed
- 100 grams Pure Maple Syrup
- 55 grams coconut oil
- pinch fine Himalayan salt
Topping
- 150 grams Raw macadamias, soaked 6 hrs, patted dry
- 150 grams Ayam coconut cream, or other thick coconut cream
- 1 teaspoon Pure Vanilla extract or vanilla bean paste
- 1 lime, juice only
- 30 grams Pure Maple Syrup
Decoration
- 1 Lime, zest only, zest with zester for fine strands
- 100 grams Raw macadamias, roughly chopped
Accessories you need
-
 Spatula TM5/TM6
Share your activity
I'm cooking this todayRecipe's preparation

Grind all the base ingredients up together in the Thermomix on speed 9 for 20 seconds, or until finely ground. Grease the inside of a 20cm springform cake tin with coconut oil. Press the base mixture firmly into the base of the tin, and up the sides if you like. Place in freezer while you prepare filling.

Blitz vanilla beans and lime zest on speed 10 for 10 seconds. Add cashews and grind on speed 10 for 8 seconds. Add remaining ingredients and blend on speed 9 for 1 minute, scraping down as needed, until lovely and smooth. Pour filling into springform tin, spreading over the base. Place in freezer for at least half an hour.
* If using soaked raw cashews, only soak for up to 6 hours, drain well and pat dry with tea towel, then mix with the other ingredients (lime, avocado, etc) all at once, blending until smooth.Mix all ingredients together until smooth on speed 9. Pour over filling and smooth with spatula.
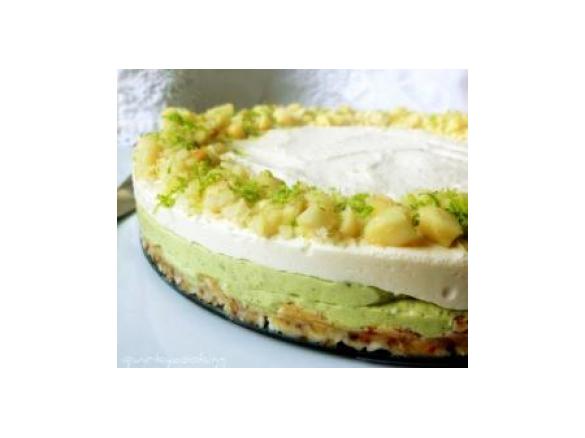
While topping is still soft, before freezing, add extra macadamia nuts and lime zest for decoration, sprinkling first the nuts, then the zest, around the edge of the cheesecake. (See photo.) Place the finished cheesecake, covered with a plastic bag, in the freezer and leave it alone for at least 2 hours, preferably more. It's best eaten semi-frozen. It will last for weeks in the freezer... but we all know that's not going to happen.
")
Base

Filling
Topping
Decoration
Thermomix Model
-
 Recipe is created for
TM 31

This recipe was provided to you by a Thermomix ® customer and has not been tested by Vorwerk Thermomix ® or The Mix Australia Pty Ltd and The Mix New Zealand Ltd.
Vorwerk Thermomix ® and The Mix Australia Pty Ltd and The Mix New Zealand Ltd assume no liability, particularly in terms of ingredient quantities used and success of the recipes.
Please observe the safety instructions in the Thermomix ® instruction manual at all times.


Comments
family enjoyed it. it definately needs to be out of the freezer 30min prior to serving
I was pleasantly surprised. Made it expecting it to taste a bit ordinary (I love real cheesecake) very nice dairy free option! Thank youThank you
Birthday cake! My 13 year old daughter managed to make this for me. So delicious, absolute winner. Thank you.
Absolutely Yum! Perfect on a hot night")
Best cheescake on the planet!
Yum! Very nice and fresh flavours.
Another winner Jo. I smoothed out the filling layer with a spatula as best as possible then put a piece of cling wrap over the top and smoothed it out with my hand. Gave a very professional finish. Also did it with the top cream layer. Thanks.
I am new to Thermomix and have just received my TM5. This is one of the first recipes I have tried, however I really struggled with the filling step. I used the spatula and also got right in there and stirred the entrire mixture 4 times. But couldn't successfully blend past 4.5 - the machine just kept on stopping and making a wierd noise. I tried for about 10 minutes before I gave up.
As a result the filling part is quiet lumpy. I'm just wondering if anyone else has had this same sort of trouble or if someone could please suggest if there is something else I should have been doing?
Thanks
I made this for dessert for a special family lunch as I knew it would cater for the various diet restrictions, plus I've been waiting for the occasion to try it. It was such a hit, everyone loved it. The flavours were described as sophisticated, and they developed as the cake got closer to room temperature. I will definitely make it again, I might try it next time with a hint of cardamon in the filling. Thank you for such a delicious cake!
Gluten Free!
Have made this a couple of times now - quick, easy and delicious!