


Preparation time
1h 0min
Total time
1h 30min
Portion
24
portion(s)
Level
medium

Ingredients
Iced Puff Pastry
- 180 g unsalted butter, cut into cubes(3cm) and frozen
- 90 g ice cubes
- 200 g plain flour
- 1/2 tsp salt
- water, extra
Vanilla Custard
- 300 g thickened cream
- 500 g Milk
- 60 g cornflour
- 120 g raw sugar
- 5 eggs
- 25 g vanilla extract
- 50 g Butter, cubed
Lemon Icing
- 3 heaped tablespoons Icing sugar mixture
- 1 tbsp Lemon Juice fresh
Accessories you need
-
 Spatula TM5/TM6
Share your activity
I'm cooking this todayRecipe's preparation
- Iced Puff Pastry
1. Place ice & butter in TM bowl and chop 15sec/Sp 10. Scrape down the sides.
2. Add flour and salt and mix 5sec/Sp 5.
3. Knead for 3min/ "Dough mode" , after 1 min of kneading, take off the MC and check to see if dough is coming together, if not, drizzle in water, HALF a teaspoon at a time, until combined. Maximum of 2 teaspoons. See the picture, it resembles little balls, they come together easily when you start to roll in a ball.
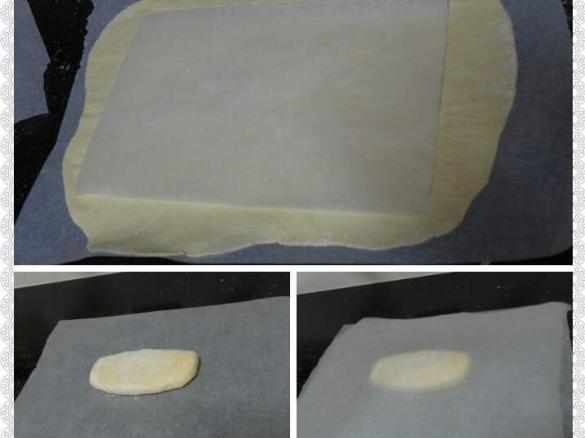
4. Roll pastry into a ball, cut into half and cover each half in cling wrap and refridgerate for 30min.
5, While pastry is chilling, place your vanilla slice tin onto a piece of baking paper and trace around the base, cut this out and this will be known as your TEMPLATE to use as a guide for the finished size of your pastry. See pic above
6. When pastry has chilled, take one ball out at a time. Place between 2 pieces of baking paper that are cut to the size of your BAKING TRAYS. See pic above.
This pastry can become sticky easily, so roll in each direction once, then lift off the top layer of paper and dust with a little plain flour, roll again, then turn the whole thing over, peel off the top layer of paper (smooth the paper out too) & dust pastry again, roll again. Keep doing this until you have rolled it to a rectangle size a little bit bigger than your TEMPLATE paper. See Pics above.
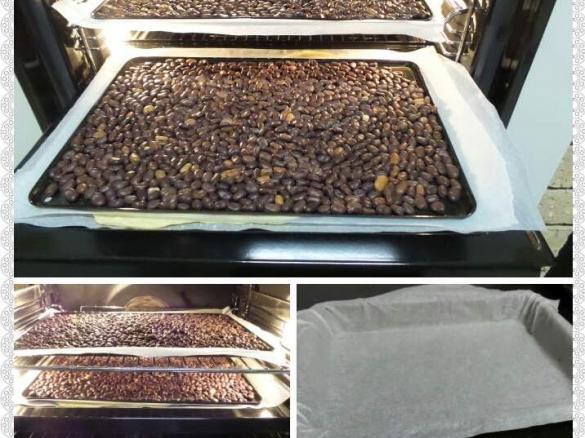
7. Leave pastry on the baking paper it has been rolled on, place on baking tray, put a new piece of baking paper on top. Now place another baking tray the same size on top and then place pie weights or dried baking beans on top of the tray.
This weighs down the pastry so it doesn't puff up too much and turns into more of a flaky pastry.
8. Repeat the rolling of the pastry with the second ball exactly the same way. You will now have 2 rolled out pieces of pastry with baking paper on top, another tray on top and wieghts on that.
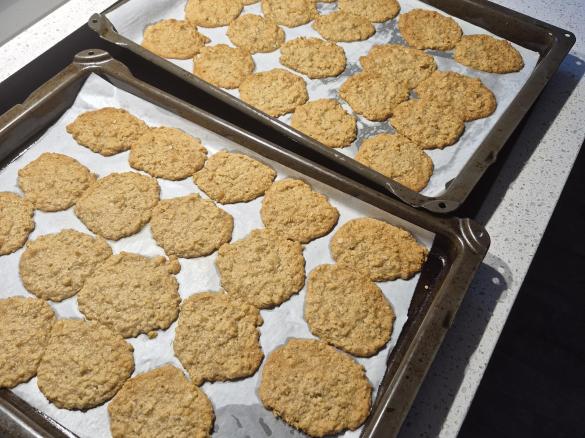
9. Bake in a hot oven at 200*C for 20-30 min until golden brown and cooked in the center as well. See pic for the weighted down trays.
When cooked, remove the top trays to cool the pastry.
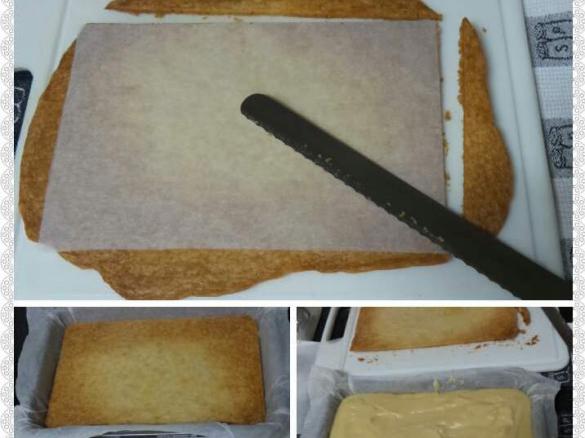
10. While the pastry is baking, get the vanilla slice tin ready by cutting a piece of baking paper a bit larger than the tin, wet and scrunch all the edges and corners of the paper, shake off excess water.
Place the paper in the tray and form around the edges, folding in the creases until it takes the shape of the tin (doesn't take too long, don't stress) Let this dry out. Also in pics above.
11. When pastry has cooled, place the TEMPLATE piece of baking paper on top and using a bread knife, gently saw the edges to trim down to the Template size, cut a tiny bit off the corners too. Then position in the bottom of the vanilla slice tray.
Cut the second piece of pastry the same but keep it aside. See pics above. Now the most of the work is done, it's easy from now on. - Vanilla Custard
1. Place the cream, milk, cornflour, sugar, eggs and vanilla into TM bowl. Cook 12min/90*/Sp 4.
2. Add butter in through the hole in the lid, mix 20sec/Sp 4.
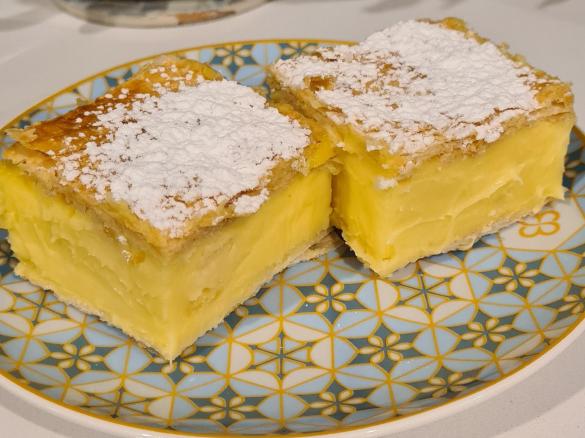
3. Pour the custard onto the pastry base as soon as it's cooked, spread it level quickly then immediately place the second piece of pastry on top. You may have to gently wiggle the piece of pastry down into the custard, but be careful not to crack it. See pics above. - Lemon Icing
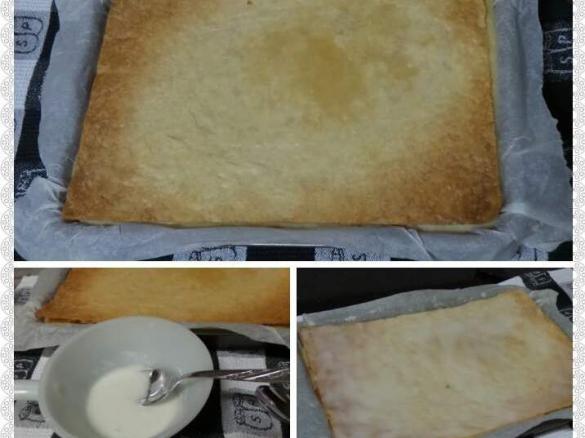
1. Place icing sugar mixture and lemon juice into a small bowl, mix together with a soup spoon. It should be like a runny paste, if it's not, add more icing sugar or lemon juice until you have the right consistency.
2. Use the back of the spoon to spread a thin layer of the icing over the top layer of pastry. See pics above.
3. Refridgerate the tray of vanilla slice until cold, then cut into squares, if you want big slices you'll get less than 24. - Valentine's Decorating
I made red hearts on my Vanilla Slices with some berry coulis, they are also nice served up for dessert with a mixed berry coulis (Recipe is on the Recipe Community with the Berry stack pavlova) drizzled over and an extra dolop of thickened cream.
Vanilla Slices
Tip
You will need:
Lamington tray (or similar)- 30cm x 20cm x 5cm approx.
4 Baking trays
Pie weights or 1kg of dried beans such as "Foulia"
Baking paper (at least a 5m roll)
The main bit of this is in the pastry, once that is done the rest is easy, it's worth it, the pastry & the thin lemon icing make this taste divine. Enjoy
Thermomix Model
-
 Recipe is created for
TM 5
If you are using a Thermomix® TM6 measuring cup with your Thermomix® TM5:
For cooking (simmering) at temperatures of 95°C or above (200°F), the simmering basket should always be used instead of the TM6 measuring cup, as the TM6 measuring cup fits tightly in the lid. The simmering basket rests loosely on top, is steam-permeable, and also prevents food spatter from the mixing bowl.Please note that the TM5 mixing bowl has a larger capacity than the TM31 (capacity of 2.2 liters instead of 2.0 liters for TM 31). Recipes for the Thermomix TM5 may not be cooked with a Thermomix TM31 for safety reasons without adjusting the quantities. Risk of scalding by spraying of hot liquids: Do not exceed the maximum filling quantity and observe the filling level markings of the mixing bowl!

This recipe was provided to you by a Thermomix ® customer and has not been tested by Vorwerk Thermomix ® or The Mix Australia Pty Ltd and The Mix New Zealand Ltd.
Vorwerk Thermomix ® and The Mix Australia Pty Ltd and The Mix New Zealand Ltd assume no liability, particularly in terms of ingredient quantities used and success of the recipes.
Please observe the safety instructions in the Thermomix ® instruction manual at all times.
Other users also liked
Show me similar recipes by:


Comments
Hi kurrie, it doesn't mean anything. Sometimes the program in this recipe community just adds things in. .. i think it's because i put the symbol for "and" there instead of the word "and"..
It has done that before to me. .. I'll take it out and put the word in. .
Hope it goes well for you. . They are really yummy, just take your time. . Good luck
can you tell me what the amp stands for, now to pastry making
Thank you!!!! So glad you tried them. I've had really good feedback from family and friends so it's good to hear others love them... The pastry works out so well hey?... Happy days!!
Thanks for such a good rating too....
Yum oh yum!