


Ingredients
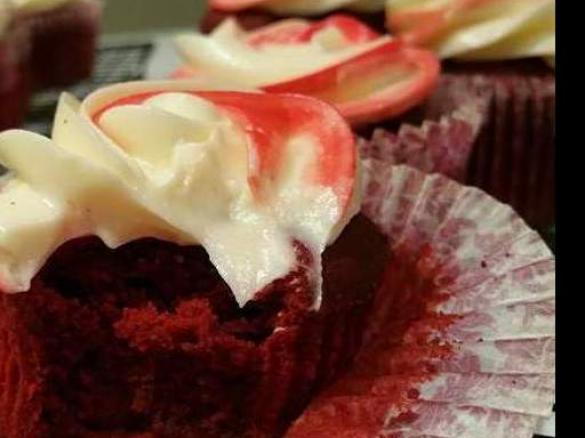
Red Velvet Cupcakes
- 225 grams Butter, softened and cubed
- 400 grams castor sugar
- 4 eggs
- 230 grams sour cream
- 120 grams Milk
- 1 bottle Red food colouring
- 1 teaspoon vanilla essence
- 310 grams plain flour
- 45 grams unsweeted cocoa powder
- 1 teaspoon bicarbonate of soda
- 1/2 teaspoon salt
Cream Cheese Frosting
- 250 grams cream cheese, cubed
- 50 grams Butter, cubed
- 1 teaspoon vanilla essence
- 310 grams icing sugar
Accessories you need
-
 Spatula TM5/TM6
Share your activity
I'm cooking this todayRecipe's preparation
1. Preheat oven to 175 degrees C and place 24 muffin cases into muffin tins.
2. Beat butter and sugar in the bowl - 1 minute/ Speed 4. Scrape down bowl. Beat for another -1 minute/ Speed 4.
3. Set it for 2 minutes/ Speed 2 - at the start of this time, add the eggs, adding one at a time through the lid hole.
4. Add the sour cream, milk, red food colouring and vanilla - 1 minute/ Speed 4.
5. Add flour, cocoa powder, baking soda and salt - 3 minutes/ Speed 5.
6. Spoon the batter between the 24 muffin cases.
7. Bake 20 to 25 minutes or until wooden skewer inserted into cupcake comes out clean. Set out to cool completely. Wash and dry your Thermomix bowl while waiting for your cupcakes to cool.
Once cooled, frost with Cream Cheese Frosting:
1. Put all cream cheese frosting ingredients in the bowl - 30 seconds/Speed 6.
Red Velvet Cupcakes
Cream Cheese Frosting
Tip
Tip 1: During warmer summer months, you may need to cover and refrigerate icing for a few hours to thicken before using.
Tip 2: When icing with cream cheese frosting, fill up the piping bag a little bit at a time, as the heat from your hands melts it and changes the texture.
To view pictures with the method, icing tips and a non-Thermomix method, visit: //thermotwinning.blogspot.com.au
www.facebook.com/thermotwinning
Thermomix Model
-
 Recipe is created for
TM 5
If you are using a Thermomix® TM6 measuring cup with your Thermomix® TM5:
For cooking (simmering) at temperatures of 95°C or above (200°F), the simmering basket should always be used instead of the TM6 measuring cup, as the TM6 measuring cup fits tightly in the lid. The simmering basket rests loosely on top, is steam-permeable, and also prevents food spatter from the mixing bowl.Please note that the TM5 mixing bowl has a larger capacity than the TM31 (capacity of 2.2 liters instead of 2.0 liters for TM 31). Recipes for the Thermomix TM5 may not be cooked with a Thermomix TM31 for safety reasons without adjusting the quantities. Risk of scalding by spraying of hot liquids: Do not exceed the maximum filling quantity and observe the filling level markings of the mixing bowl!

This recipe was provided to you by a Thermomix ® customer and has not been tested by Vorwerk Thermomix ® or The Mix Australia Pty Ltd and The Mix New Zealand Ltd.
Vorwerk Thermomix ® and The Mix Australia Pty Ltd and The Mix New Zealand Ltd assume no liability, particularly in terms of ingredient quantities used and success of the recipes.
Please observe the safety instructions in the Thermomix ® instruction manual at all times.


Comments
Light and fluffy and quite delicious!

When my son asked for cupcakes at work the next day I searched and found this recipe. They were simple to make and oh so yummy. I already had red velvet color paste which I didn't need anywhere near the amount suggested here. Very nice and will cook again.
Delicious Cupcakes
I made a batch of these cupcakes for Staff Appreciation week. The recipe was easy to follow and the result - light, fluffy, melt-in-your-mouth cupcakes!
Thanks for sharing yout amazing recipe.
Great tasting but mine were a little dense. Thanks for the recipe!
Delissh.....my family absolutely loved them")
Thnk u")
My daughter made these and they were awesome")
Yum
Thanks Sophia. Delicious!